Create Order
Single Order
Orders may be generated on behalf of end-user requests from your control panel using this feature. The order can be placed for a Registered User, a Non-Registered User, a New User (i.e. a new user whose information is being stored), or a Guest User (i.e. new user, but you are not storing the user details).
You may provide a payment link to the appropriate user through email so that they can pay for these orders.
You also have the option of entering payment information and authorising these orders.
What are the advantages of this?
This feature allows a merchant to place an order on behalf of a customer via the Anywhere Commerce control panel by gathering information from the consumer during a phone conversation.
This feature will allow Registered Users, Non-Registered or New Users, and Guest Users to place a purchase with you by simply contacting the storefront's phone number.
Because this order is placed over the phone, the customer does not need to know how to use a computer to place it.
From my Control Panel, how can I place an order on behalf of a current client, a new user, or a guest user?
To place an order on behalf of an existing customer (Registered User), a new user (Non Registered User), or a guest user (without registering the user credentials), navigate to your Control Panel, Orders & Leads> Create Order:
Select Single Order from the Create Order menu. You'll be sent to the Order Creation > Single Order page.
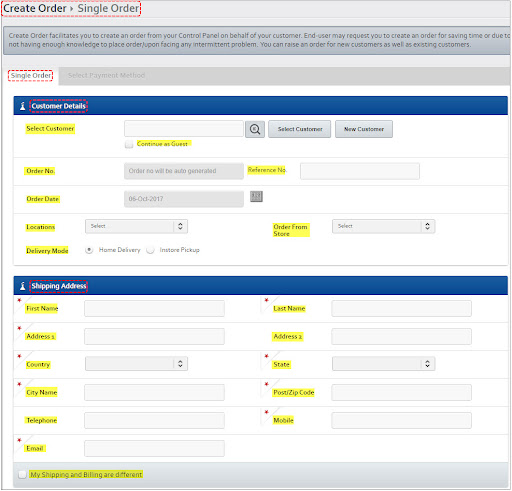
You can place an order against a Registered User, a Non-Registered or New User, or a Guest User (i.e., a new user whose information is not stored).
1. Creating an order against a guest user (that is, without registering the user's information):
Enter the user's email id in the Select Customer text box and click the Continue as Guest option to place an order on their behalf.

In the Reference No. text box, type the order's reference number.
From the Locations drop-down, choose a needed place where the order will be completed.
From the Purchase From Store drop-down menu, choose a store from which to place your order.
Choose the appropriate delivery mode from the Delivery Mode section.
-
Home Delivery : If the ordered items are to be sent to the user's shipping address, then select this option.
-
Instore Pickup : Select this option if the user wishes to pick up the ordered items from a specific store location.
If the 'Instore Pickup' option button is chosen, only the Billing Address part will be displayed and not the Shipping Address portion.
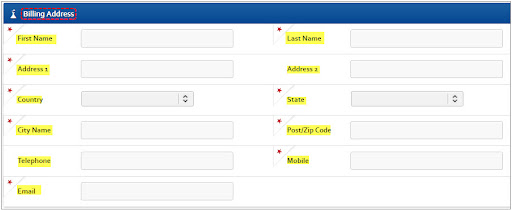
Both the Billing Address and the Shipping Address fields are identical.
Adding Product in the cart
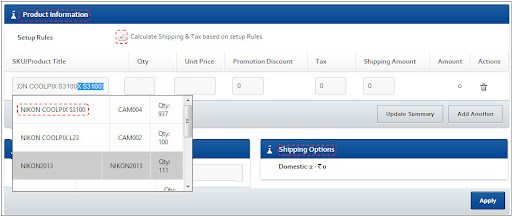
Select the Calculate Shipping & Tax based on setup Rules checkbox to apply shipping and tax costs, as well as cart promotional discounts, as configured for the selected product(s).
In the SKU/Product Title text box, type the first few characters of the SKU/Product Title/Catalogue Code. The applicable goods will be displayed in an auto-completed list.
Choose an appropriate product for which to make an order. The minimum purchase quantity, unit pricing, and other relevant information will be automatically collected and shown in the appropriate areas.
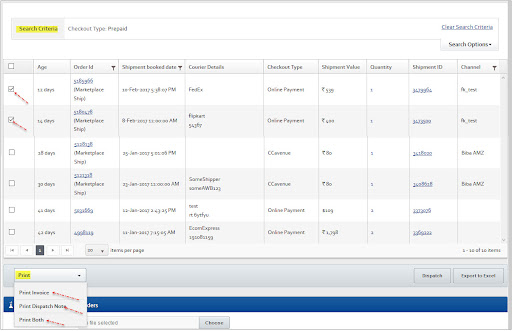
Similarly, add more items (if required) by clicking on the Add Another button
In the Qty text box, change the quantity (if necessary).
To remove a product, go to the Update column and click the cross symbol next to it.
In the Promotion Discount text box, change the promotion discount (if necessary). (When the 'Calculate Shipping & Tax based on setup Rules' option is unchecked, this field becomes editable.)
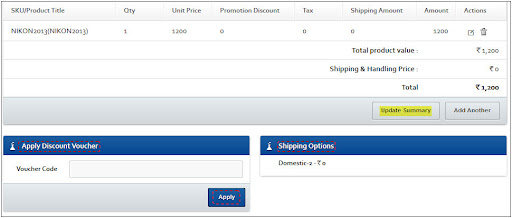
Click the Update Summary button to update the net order price. The pricing will be updated and displayed in the manner depicted in the below image.
Click the pen symbol of that product beneath the Update column to edit it (if necessary).
If you choose Instore Pickup as your 'Delivery Mode,' the Shipping Options section will be missing.

From the Delivery Date 'date picker,' choose the delivery date (as requested by the customer).
If you have delivery slots, choose a delivery date.
From the Delivery Time drop-down, choose an appropriate delivery time.
Validation message: If you have delivery slots but are not picking the delivery date, time, or saving the order, a validation message will be presented in a dialogue box. You can, however, go ahead and proceed without setting the delivery times.

Click OK on the dialogue box.
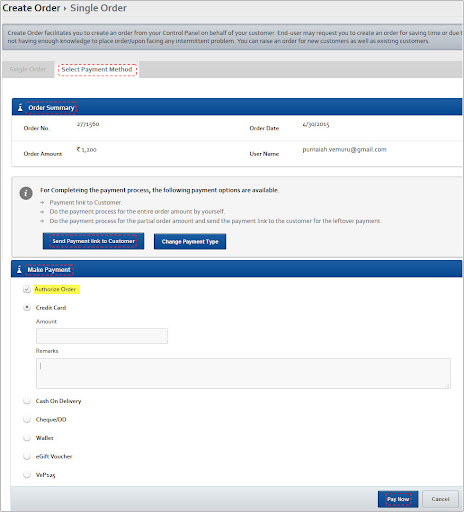
You may either provide a payment link to the user or enter the payment information yourself and authorise the order.
Click Send Payment Link to Customer to send the user a payment link. A dialogue box titled "Send payment link to customer" will appear.
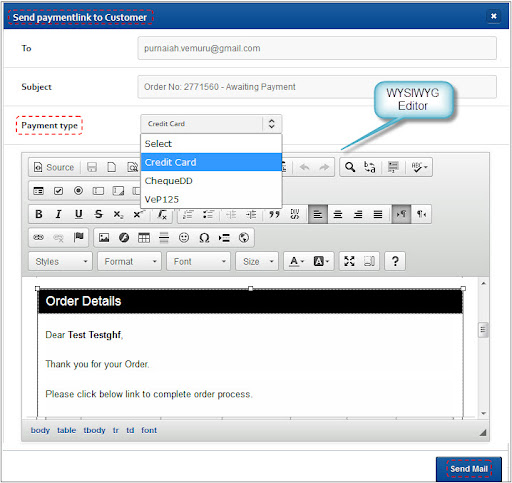
Choose a payment method from the Payment Type drop-down menu. When you specify the 'Send Mail to end user:' part of that template in the WYSIWYG (What You See Is What You Get) Editor, the applicable email template for the specified 'Payment Type' (i.e. Credit Card, Cheque/DD, Online Bank Transfer, etc...) will be obtained. If necessary, you may also customise this template specifically for this order.
Click Send Mail to send the buyer a payment link. The consumer will receive mail.
The email event Send Order Invoice should be configured to send an email to the end consumer with the payment link.

You may also make a payment from any order's Order Details page. Go to the Payment Pending Orders page to make a payment for this order.
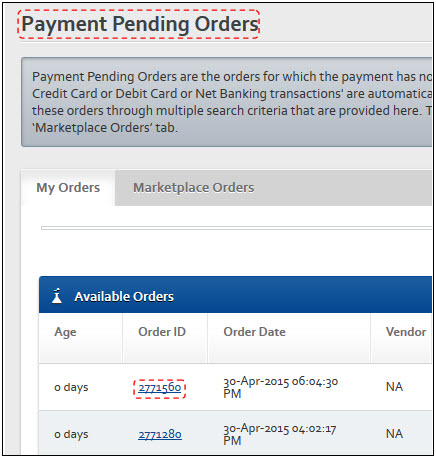
Select the appropriate Order Id. You'll be sent to the Order Details page for that particular order.
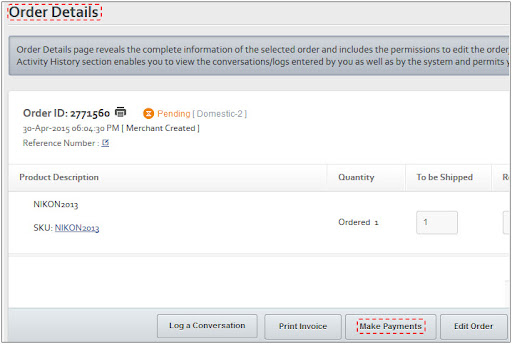
Make a payment by clicking Make Payments. You'll be taken to the Create Order > Single Order page's Select Payment Method section. Go to the section where you may make a payment.
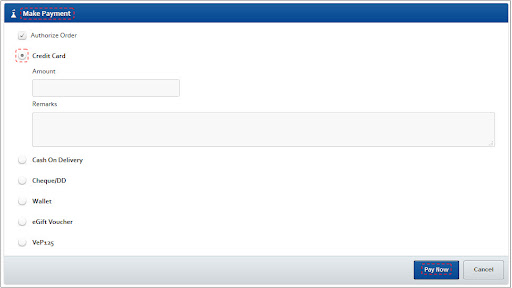
Select the Authorize Order checkbox to authorise the order (if necessary).
Choose an appropriate payment option and fill in the required information. Click the "Pay Now" button. A dialogue window will ask you to confirm your action.

Click OK if the amount is right. The confirmation dialogue box will be closed, and a corresponding success message will be shown.

If the payment value is incorrect, click Cancel and make the necessary changes, then repeat the process.
2. Placing an order against a Registered user:
Enter the registered user's 'User Id' ( Email Id/ Mobile number/ External Id) in the Select User text field and click the search icon. Under the Shipping Address area, the user's information will be automatically retrieved if there is an address saved against the user.
If a user has numerous shipping addresses, they may be found in the Shipping Address area, as seen in the image above.
You may also update the shipment address (if necessary) by clicking the Edit button.
You may also use the Create New link to create a new delivery address.
Search for a Registered user for placing an order
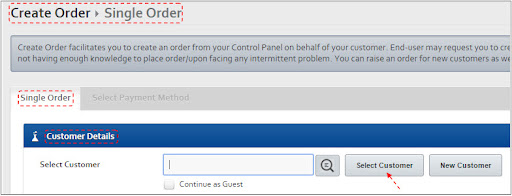
Select Customer from the Customer Details section of the Create Order > Single Order page to find the registered user. You'll be sent to the User List dialogue box, which will show you the various filtering choices.
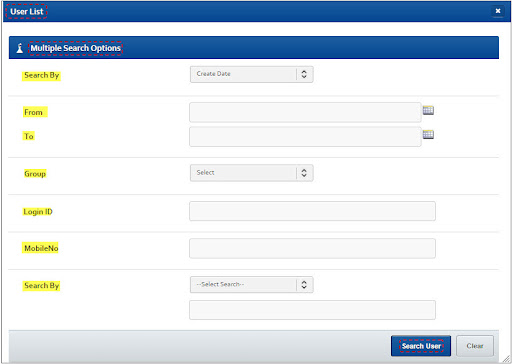
Pick the Create Date from the Search By drop-down to identify the needed user. To search the registered users by the 'Order Creation date,' select the Create Date from the Search By drop-down.
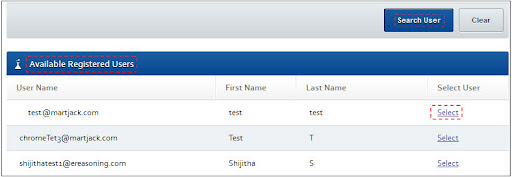
Select a user by clicking the necessary user's Select link. The User List dialogue box will be closed, and the Select Customer text box will be updated with the username of the selected user. The selected user's contact information will now be immediately updated in the Shipping Address area of the Create Order > Single Order page.
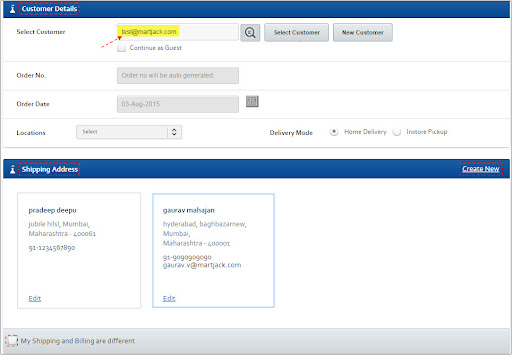
If a user has numerous shipping addresses, they may be found in the Shipping Address area, as seen in the picture above.
You may also update the shipment address (if necessary) by clicking the Edit button. You may also use the Create New link to create a new delivery address.
The billing and shipping addresses will be the same, but you can change them as needed. Select the 'My Shipping and Billing are Different' checkbox and edit the needed entries in the Billing Address area to change the billing address.
3. Register a new user and Placing an Order
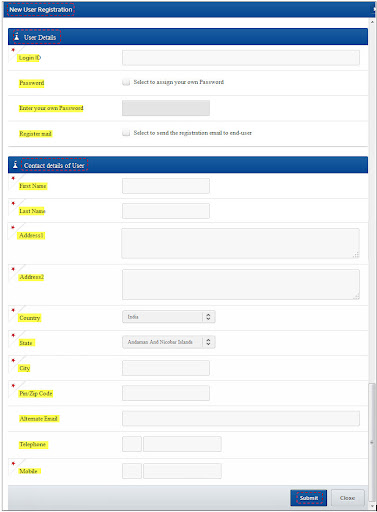
To place an order on behalf of a 'New Customer,' go to the Create Order > Single Order page and click New Customer under the Customer Details section. The New User Registration dialogue box will appear, with the relevant data fields for creating a new user.
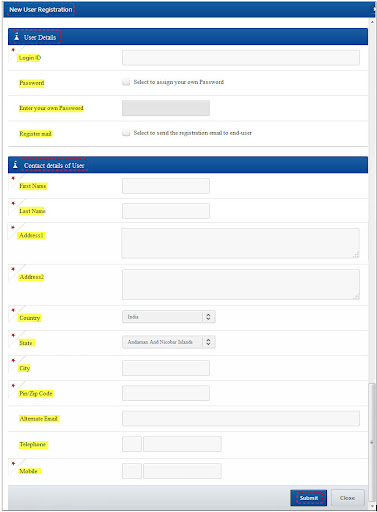
Mandatory fields are those highlighted with a red asterisk.
In the Login ID text box, type the user's login id.
The password is set by default.
Select the 'Select to assign your own Password' checkbox to customize the password. Otherwise, a password is set by default.
Update the user's contact information.
The Billing and Shipping Addresses will be the same, but you can change them as needed. Select the 'My Shipping and Billing are Different' checkbox and edit the needed entries in the Billing Address area to change the billing address.
Bulk Order
You may place bulk orders on behalf of Registered Users, Non-Registered or New Users, and Guest Users from your control panel (i.e. new user & without storing user details).
This feature allows a merchant to place an order on behalf of a customer from the Anywhere Commerce control panel by gathering information from the consumer during a phone conversation.
This order is placed over the phone, and the consumer does not need to know how to use a computer to place it.
How can I use the Control Panel to generate bulk orders?
Select Bulk Order from the Create Order menu. You'll be sent to the Bulk Order > Create Order page.
You must download the Bulk Excel format in order to enter bulk order information. Click on the link provided to get the excel spreadsheet. After that, the BulkOrder.xlsx file is downloaded. Double-click the BulkOrder.xlsx file to open it. As indicated in Figure, Excel will be launched and presented.

There are three papers in this package. Specifically, Order Information, Item Information, and Payment Information. Order Info will be shown by default. In this sheet, fill in the following information about the order:
a. Order Information: Order Ref No., Order Date, Customer Type, Email ID/User ID, Order Amount Calculator, and so on.
b. Item Information (also known as Product Information): Order No., Product SKU, Variant SKU, Quantity, Unit Price, and so on.
c. Payment Information: Order Reference Number, Checkout Type, Payment Instrument Number, Transaction Amount, Payment Status, and so on.
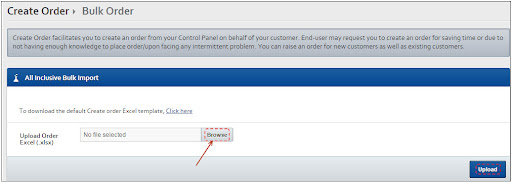
Select the Browse option. The File Upload dialogue box will appear.
Click Open after selecting the BulkOrder.xlsx file from the saved folder. The dialogue box will shut, and under the Browse button, the name of the selected file will be shown.

Click the Upload button. The file will be uploaded, and you can examine the job history in the Import Tasks area.
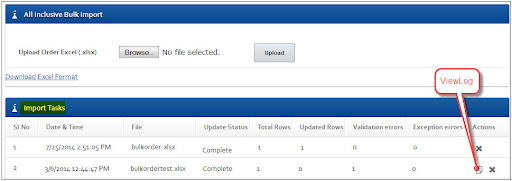
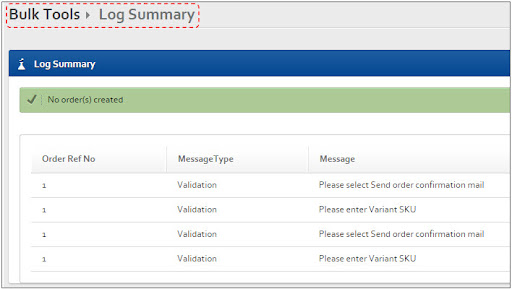
If there are any issues with bulk order generation, you'll notice a Bulk Order cross symbol next to the job, which you may click to examine the specifics.
Updated almost 2 years ago
