Pending Order, Failed and Conflict Orders
Orders and Leads
Order input, processing, and fulfilment of orders from the point of purchase to payment and delivery are all available through the OMS. This sort of system is used by brands that have the following characteristics: Customer, vendor, and purchase order records are all accessible. You can see all these details under the Orders and Leads tab which will present all the necessary information required.
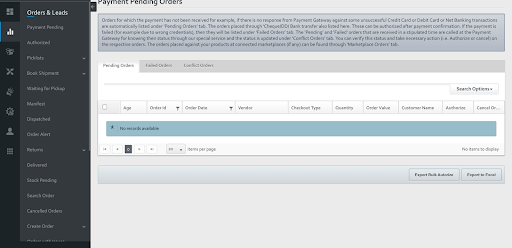
Payment Pending Orders
Payment Pending Orders are orders for which payment has not been received, such as when the Payment Gateway does not respond to some unsuccessful 'Credit Card', 'Debit Card', or 'Net Banking' transactions, the browser is closed, logged out, a technical failure occurs, the user clicks the back button, and so on.
To access the Payment Pending Orders, head over to Orders and Leads >> Payment Pending
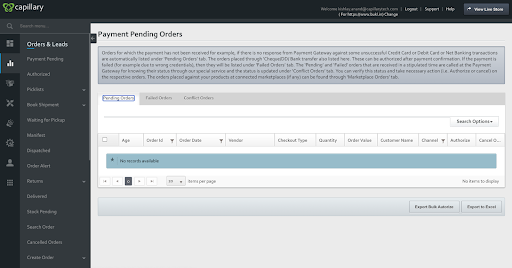
The Payment Pending Orders presents an interface to check all payment related transactions and orders as shown below. Pending Orders, Failed Orders, and Conflict Orders are the three tabs here. These are all of your orders from the store.
Pending Orders
Orders for which payout has not been received are automatically listed under the 'Pending Orders' tab if there is no reply from Payment Gateway against some unsuccessful 'Credit Card', 'Debit Card', or 'Net Banking' transactions due to idle for more period, close browser, logged out, or technical failure are listed under the 'Pending Orders' tab.
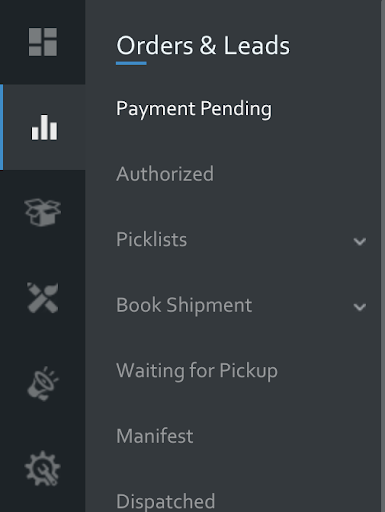
The Pending Orders tab presents the information of every transaction in the format shown above:
- Age - When the transaction occurred
- Order ID - Reference number for identification
- Order Date : The time and date of the transaction
- Checkout Type : Mode of purchase
- Quantity : The quantity of stock ordered
- Order Value : The value of the order placed
- Customer Name : Name of the customer who placed the order
- Authorise and Cancel : You have the option to either authorise the payment and process it or cancel it.
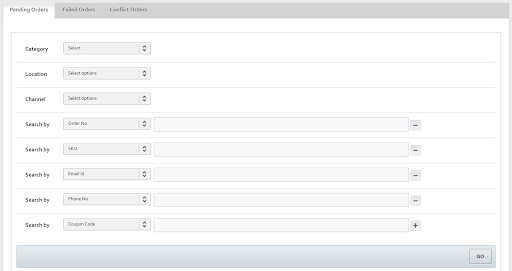
When there are a lot of outstanding orders, it's tough to figure out which one you need to act on. However, we provide a variety of search options for filtering orders based on your specific search parameters. Click Search Options to filter the orders. The available search possibilities will be provided in the section as shown below.
-
Click the Category drop-down and choose a needed Category from the available list to get a list of orders for a given category.
-
Select appropriate stock locations from the Location drop-down to list out the orders through your stock locations.'
-
Select the appropriate channel from the Channel drop-down to show orders received through a marketplace channel where you sell your items.
Search By: Using this option, you may create a list of orders based on a variety of parameters.
You can use one or more of the search parameters listed above to meet your needs, then click GO. The orders will be shown according to the search criteria you choose.
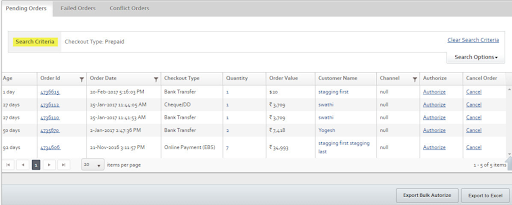
Authorising the Order: Once you've received payment confirmation, you can authorise a pending order.
Cancel Order : If a payment fails or for any other reason, you can cancel a pending order.
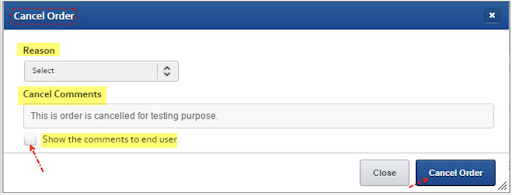
To cancel an order, go to the order's Cancel link. You'll see the Cancel Order dialogue box appear.

Viewing Order Details

You can view order details by clicking on the respective Order ID. You will be sent to that order's Order Details page.
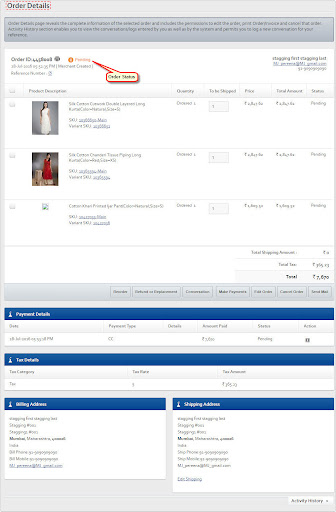
You may check the order's status. You may examine the order's entire information here, as well as do a variety of activities on it, such as reordering, logging a chat, making a payment, changing the order, cancelling the order, sending a message to the user, printing the order, and so on.
- Failed Orders - The payment will be reported under the 'Failed Orders' page if it fails (for example, owing to incorrect credentials, disconnected internet, or other technical difficulties).
- Conflict Orders - The 'Pending' and 'Failed' orders that are received within a certain time frame are contacted by our special service at the Payment Gateway to determine their status, and the status is updated under the 'Conflict Orders' tab. You can check this status and take appropriate action (authorise or cancel) on the orders.
Authorised Orders
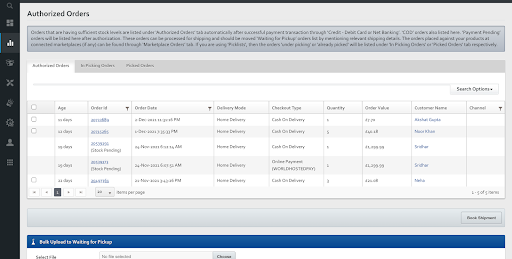
After a successful payment transaction using 'Credit - Debit Card or Net Banking,' orders with acceptable stock levels are automatically listed under the 'Authorized Orders' tab. Orders that are 'COD' are also noted here. After authorisation, 'Payment Pending' orders will be posted here.
These orders may be shipped and should be moved to the 'Waiting for Pickup' orders list with the required shipping information.
On the Authorized Orders page, you may conduct the following operations.
- Book shipments, i.e. shipping of items in an order (s)
- Schedule a shipping order for a partial order, such as a few goods or a small quantity of an order.
- Ship the orders in bulk.
- Place all or necessary item/items on hold or unhold on an Order.
- Transfer an Order, or chosen items from an Order, from one store/warehouse to another.
- Cancel and receive a refund (Payment Method - other than COD)
- Reschedule an authorised order before it is sent.
Only if you are not utilising the 'Picklists' method can you locate the 'Book Shipment' button in the 'Authorized Orders' page.
What is the procedure for scheduling shipments or delivery for my 'Authorized' orders?
To change orders from the 'Authorized' to the 'Waiting for Pickup' list, or to schedule shipments for your authorised purchases.
Click the Authorized button. The Authorized Orders page will be shown.
You can further filter these Orders (if necessary) using the many options available below. Click Search Options, pick the needed search parameters, and then click GO to filter the orders.
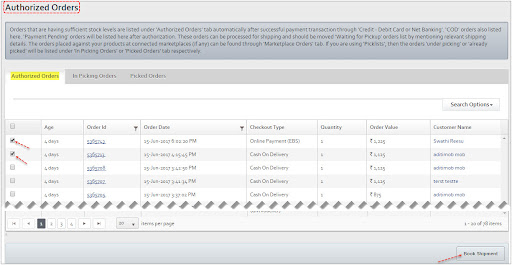
The orders will be listed (if any) according to the search criteria you choose.
Choose the checkboxes next to the orders you wish to book shipments for or transfer to the 'Waiting for Pickup' list.
After you've made your selections, click Book Shipment. The page Book Shipment > Bulk Orders will be shown.
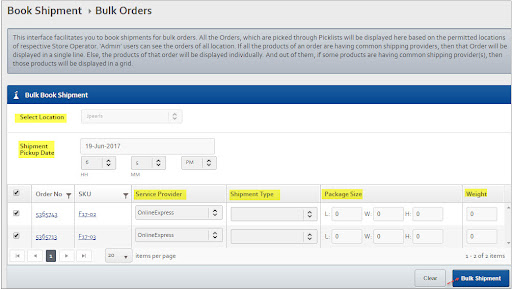
At the Select Location drop-down, the first location of your store will be picked by default. The order fulfillment location for the orders mentioned below will be this location. The Select Location drop-down allows you to alter the fulfillment location (if necessary) for an order.
You may also use the Shipment Pickup Date 'day & time selector' to adjust the pickup date and time.
Under the Service Provider column, a service provider with the greatest logistic priority and set of rules set by the operations team which will be picked by default for each order.
You must pick the appropriate kind of shipping if you selected an integrated logistic service provider under the Service Provider column.
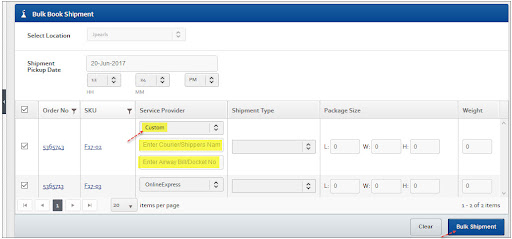
-
In the appropriate text fields, type your custom courier name and the docket number (if applicable).
-
Under the Package Size column, type the package's measurements in the appropriate text fields, i.e. L, W, and H.
-
In the Weight column, type the package's weight in the appropriate text box.
Click Book Shipment to schedule the shipments. The shipment will be scheduled, and you will get an appropriate success notice.
Orders that are 'under picking' or 'already picked' will be shown under the 'In Picking Orders' or 'Picked Orders' tabs, respectively, if you're using 'Picklists.'
How can I ship my orders in bulk?
Follow these steps to send your orders in bulk (i.e. Authorized Orders):
Go to the section under "Bulk Upload to Waiting for Pickup."
You must first download the Excel format. Click the Download Format button to get the file. The file ShippingOrders.xlsx will be downloaded to your computer. To open the file, double-click it. The file will be opened in the manner depicted in the diagram.
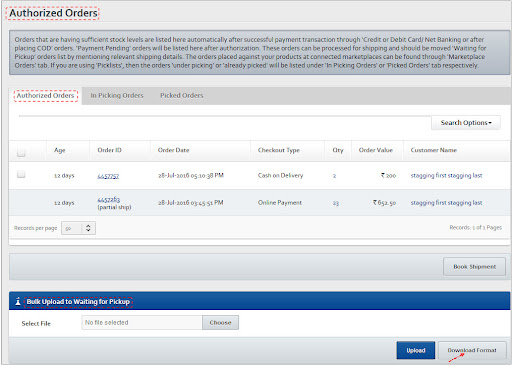
Fill in the order information (according to the format) in the appropriate cells and save the file in a convenient location.

Choose ShippingOrders.xlsx from the drop-down menu. You'll see a File Upload dialogue box appear.
Click Open to open the ShippingOrders.xlsx file from the saved location. The dialogue box will shut, and the Select File text box will display the name of the selected file.
Click the Upload button. The orders in question will be dispatched. A suitable success message will be presented to you.
IMPORTANT : If a partial shipping of an order has been completed, the Order ID will be marked with a '(partial ship)' tag in the Available Orders section.
Until all goods have been dispatched in full quantity, the order will be posted under the Authorized Orders page.
You may also discover the partially shipped order in the Waiting for Pickup, Dispatched, or Delivered orders lists, and you can print a dispatch report if you find it in any of these orders lists using the Shipments portion of the Order Details page.
How can I cancel an authorised order and receive a refund?
Only if the payment is made using 'online payment' may you cancel and return an authorised order (partially or completely). To do so, follow the steps below:
You can further filter these Orders (if necessary) using the many options available below. Click Search Options, pick the needed criteria, and then click GO to filter the orders.
The orders will be listed (if any) according to the search criteria you choose.
To cancel and refund an order that was placed with 'Online Payment,' click the Order ID (this is a link). This will take you to the Order Details page for the order you've chosen.
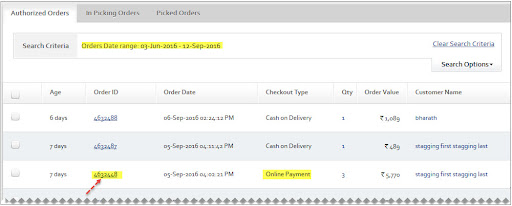
Choose the items that will be cancelled and reimbursed. If you wish to return the entire order, choose all goods. To cancel an order, click Cancel Order. You'll see the Cancel Order dialogue box appear.
The Qty text box may be used to edit the amount that will be cancelled and refunded.
From the Reason drop-down menu, choose the reason for the cancellation. (Mandatory)
In the Cancel Comments text box, type the cancellation comments. (Mandatory)
Select the 'Show the Comments to End User' text box to show these comments to the end user.
Select the Initiate Refund Process checkbox to begin the refund process. The area after that will be opened.
From the Payment Type drop-down, choose a suitable payment type (for example, NEFT). The accompanying text fields for the chosen payment method will appear. (For NEFT, the text fields for 'Account Number,' 'IFSC Code,' and 'Bank Name' will be shown.) Fill up the blanks with the necessary information.
Select the Include Shipping Amount text box to include the shipping cost (if applicable) in the refund amount.
Click Cancel Transaction to cancel the order and receive a refund. A dialogue window will appear, asking for confirmation to delete the item.
The status of the cancelled product(s) will be modified, as will the status of the order.
Picklists
A Picklist is a list of items that must be chosen from a warehouse/store in order to complete the warehouse/permitted store's Orders. Selecting all or part of the goods from needed Orders may be used to construct a Picklist.
Picklists should be produced by location (store/warehouse) and allocated to a designated individual (for example, a store operator or a warehouse employee) to process them. 'Zone wise' against the given place may also be used to construct a picklist. This capability is useful for picking up things where certain products are kept at each location per zone.
You may also make a picklist against any certain 'delivery slot' on a specified day. You may establish a picklist for each of the essential marketplace channels.
After you've finished creating the picklist, print it out and give it to the individual who will be choosing the goods.
Picklists help the methodical procedure of item selection in accordance with received Orders, reducing the time required to pick the products. The goods may be chosen fast and simply, ensuring the highest level of accuracy in order fulfilment.
What's the best way to make a picklist?
Select Create Picklist from the Picklists menu. You'll be sent to the Create Picklist page under Picklists.
You can also go to the Picklists > Create Picklist page by going to the 'Picklists > Manage Picklists' page and selecting the Create New Picklist button.
Select a store/warehouse location for the picklist to be produced from the Select Location drop-down.
The previous and current days are picked by default in the From Date and To Date 'date selectors.' When you search with default dates, the 'Authorized Orders' that are received at a certain location but for which no picklists have been made will appear. However, using the relevant 'Date Pickers,' you may change these dates to suit your needs.
From the Select Zone drop-down menu, choose 'Zone' (optional). When you choose a 'Zone,' the search results will provide a list of 'Authorized Orders' from the given location that were received during the specified date period and contained items from the chosen 'Zone.' As a result, you may use this option to generate 'Zone wise' picklists.
Choose the desired date from the 'Date' 'date picker'.
Select the desired delivery slot from the Delivery Slot drop-down menu to get a list of the orders for that delivery slot on the specified date.
Choose the relevant marketplace channel(s) from the Channel multi-select drop-down to get a list of that channels' orders.
Click the Search button. As illustrated in the diagram, the corresponding ordering will be listed beneath the grid.
Click 'Create' after selecting full Orders or needed Order goods. The picklist will be formed, and a corresponding success message will be shown.
How can the selection of items from a picklist be confirmed?
Select Confirm Picking from the Picklists menu. You'll be sent to the Confirm Picking page under Picklists.
The 'Picklist Id' or 'Order Id' can be used to confirm item selection. Select the PicklistID option from the drop-down to confirm via the 'Picklist Id'. So, you may scan or input the 'Picklist Id' here utilising this option.
Scan the 'Picklist Id' of the picklist you wish to confirm. As illustrated in the image, the information of the corresponding picklist will be presented.
Scanning or entering the Product EAN Codes (i.e. 'SKUs'/'Variant SKUs - in the case of Variant Product') of the specified 'Picklist Id' one by one is now required.
The grid will be updated with the appropriate products. To change the item level information, you have two alternatives.
i) You have the ability to change the MRP and Web Price.
You can make changes to the MRP or Web Price (if required). To edit the MRP, go to the MRP column and click the Edit link. To modify the MRP, a text will be presented.
Click Update after making changes to the MRP. The MRP will be modified, and a success message will appear.
ii) For needed products, you can specify item-level information. For instance, Batch/Sl.No./Expiry, and so on.
If applicable, enter item-level information (in this case, the batch number) in the appropriate area and click Update. The item-level information will be updated, and a corresponding success message will be presented.
Similarly, for the needed goods, adjust the pricing and any specific item-level information.
When you're finished, click Close. The dialogue box will disappear, and the newly added goods will appear as indicated in the figure.
If necessary, you may eliminate the undesirable products by clicking the trash symbol in the Actions column.
By pressing the Scan button, you may add additional things to the picklist.
You can confirm the picking once all of the items have been added. Click Confirm Picking to confirm the selection.
If necessary, you may eliminate the undesirable products by clicking the trash symbol in the Actions column.
By pressing the Scan button, you may add additional things to the picklist.
You can confirm the picking once all of the items have been added. Click Confirm Picking to confirm the selection.
On the 'Picklist Summary' page, there are five tabs. They are as follows:
-
All: The 'All' tab displays all of the picklist's mapped products.
-
Pending: The Pending tab contains things that have no status, such as 'found' or 'not found.'
-
Not Found: Required items can be manually transferred from the 'Pending' page to the 'Not Found' tab.
-
Confirmed: The confirmed picklist items will be instantly moved from the 'Pending' tab to the 'Found' tab.
-
Removed: You can remove needed picklist items from any tab, and they will be listed under the 'Removed' tab.
From the Picklists > Picklist Summary page, you can now set a picklist's status to Picked. To do so, select Status from the drop-down menu. The options listed below will be shown.
From the Status drop-down menu, choose Picked. The state of the picklist will be changed to Picked, and a corresponding success message will be shown.
How can I manage picklists and perform certain tasks?
This interface allows you to examine and manage existing picklists as well as create new ones.
The 'Open' page displays picklists with the 'Created' and 'In Picking' state.
The 'All' tab displays all picklists, including those with the 'Picked' status.
Picklists with the status 'Picked' appear on the 'Picked' page, from which you can print a picklist or its labels, as well as download a picklist in CSV format.
Under the 'Not Found' tab, picklists with some not found items will be presented.
By clicking a picklist's code, you may get to the 'Picklist Summary' page.
Under the Open tab of the Available Picklists section, the available picklists for the chosen date range will be presented by default.
TIP: Using the various filtering options, you may create a list of picklists. Then, based on your search parameters, the appropriate picklists will be provided below.
How to mark certain items as ‘Not Found’
Go to the picklist with the pending goods. Under the Open tab, click the 'Picklist Code' that has pending products. The page 'Picklists > Picklist Summary' will appear.
Select the Pending tab from the drop-down menu. Orders with pending items will be presented to you.
Mark the needed goods from the various orders as not found by clicking 'Mark as Not Found.' The goods you've chosen will be transferred to the 'Not Found' menu, and you'll receive an appropriate success message.
Book Shipment
This interface is designed for merchants that make use of the picklists feature. This interface allows you to schedule shipments for only those goods whose status has been changed to 'Found' using a picklist. This interface makes it easy to schedule shipments for a single order one by one.
The shipments can be scheduled with either an integrated logistics service provider or a bespoke supplier.
The appropriate shipments will be put to the 'Waiting for Pickup' orders list after the shipment has been scheduled.
How to book shipment using picklist?
The following is the method for booking shipments using picklists:
-
The end users are the ones who place the orders.
-
The order allocation service assigns the order to a store location/warehouse based on the relevant rules, and then that store location/inventory warehouse's of the ordered items is reduced.
-
Authorized orders are delivered to the appropriate warehouses.
-
After receiving orders, the separate warehouses prepare picklists.
-
A warehouse employee will be assigned to each picklist throughout the creation process, and he or she will be responsible for choosing the products from the appropriate shelves.
-
After choosing the things, the warehouse staff should double-check the items chosen.
-
The picking confirmed goods' status will be updated to 'Found.'
-
Fetch the items that have been confirmed as selected. The merchant can choose which things to dispatch.
-
The merchant must choose a logistic service provider and fill up the remaining details before clicking 'Ship.' The corresponding order will be added to the 'Waiting for Pickup' list.
How can I schedule a shipping for a single order handled using picklists?
To schedule a shipping for a single order completed through the picklists, follow these steps:
Select Single Shipment under Book Shipment. You'll be taken to the Single Order > Book Shipment page.
In the 'Order No' text box, provide a valid order number for which picking confirmation has been completed for some or all goods using the 'picklists' capability, and then click the search icon.
The verified chosen goods from that order will be fetched in a grid, as shown in the picture.
The Service Provider drop-down will default to a service provider with the greatest logistic priority as indicated by you. If necessary, you might change the logistic service supplier.
The Courier/Shippers Name and the Airway Bill/Docket No text fields will appear if you choose the 'Custom' option from the Service Provider drop-down.
- In the Courier/Shippers Name text box, provide the name of your bespoke logistics service provider.
- In the Airway Bill/Docket No text box, enter the airway bill/docket number for your bespoke logistics service provider.
From the 'Cargo Pickup Date' 'date picker,' choose the date of the shipment to be picked.
Dimensions: Fill in the length, width, height, and weight of the package in the appropriate text fields.
To arrange a shipment, select the needed product or all of the order's goods.
A popup titled "Add Custom Fields" will appear.
Click Save Values after entering the values for the individual shipping item custom characteristics. The dialogue box will be closed when the values have been saved.
Select 'Ship' from the drop-down menu. The shipping will be scheduled for the appropriate items. A suitable success message will be presented to you.
By clicking the corresponding links in the success message, you can also see, download, and print the dispatch and invoicing reports.
The package has now been added to the 'Waiting for Pickup' orders list.
Waiting For Pickup
These orders are transferred here from the Authorized Orders list by arranging the shipment and providing the appropriate shipping information.
The shipments booked with the 'Book Shipment' module will be listed here if you're using the Picklists module.
These orders are now being picked up by their respective shipping service providers.
After those shipping service providers have picked up the merchandise, these orders must be manually transferred to the 'Dispatched' orders list using the 'Dispatch' button.
By downloading the data of required orders, amending the necessary information, and uploading the corresponding spreadsheet format, you may bulk dispatch the orders (i.e. dispatching orders in bulk amount).
What is the procedure for dispatching a 'Waiting for Pickup' order?
To move orders from the 'Waiting for Pickup' list to the 'Dispatched' list or to dispatch a Waiting for Pickup order, follow these steps:
Click on 'Waiting For Pickup' under the Orders and Leads section, as illustrated below.
The orders will be listed (if any) according to the search criteria you choose.
Choose the checkboxes next to the orders you wish to transfer to the 'Dispatched Orders' list.
Select the checkbox in the Header section to select all of the orders.
After you've made your selections, click Dispatch.
The orders will be sent out, and you will receive an appropriate success notification.
How can I get a refund for an online payment order that is waiting for pickup?
To get a refund for an online payment that is waiting for pickup, you must first:
Cancel the delivery (s)
Cancel the entire purchase or the order's needed goods and begin the refund process.
To get a refund on an order that is waiting to be picked up, complete the following:
-
You can further filter these Orders (if necessary) using the many options available below. Click Search Options, pick the needed search parameters, and then click GO to filter the orders.
-
The orders will be listed (if any) according to the search criteria you choose.
-
To cancel and refund an order, click the appropriate Order ID (this is a link) that has the 'Online Payment' that you wish to cancel. This will take you to the Order Details page for the order you've chosen.
Go to the section called "Shipments."
Select the shipment you wish to remove and click the delete symbol. A dialogue window will ask you to confirm your action.
Click the OK button. The cargo will be removed from the system, and the dialogue box will close.
Cancel additional shipments as well (if any and if required).
You can now cancel those goods in order to complete the refunds.
Click Cancel Order after selecting the required products to be reimbursed. You'll see the Cancel Order dialogue box appear.
The Qty text box may be used to edit the amount that will be cancelled and refunded.
From the Reason drop-down menu, choose the reason for the cancellation. (Mandatory)
In the Cancel Comments text box, type the cancellation comments. (Mandatory)
Select the 'Show the Comments to End User' text box to show these comments to the end user.
Select the Initiate Refund Process checkbox to begin the refund process. Then the next piece will be revealed.
Only for online payments will the Initiate Refund Process checkbox be visible. It will not be visible for offline payments such as 'COD.'
How can I print the appropriate shipments' invoice or dispatch note?
Select Orders and Leads from the drop-down menu. Getting Ready To Be Picked Up > Go to the appropriate order.
Select the checkbox next to each order for which you want to print an invoice.
Select the appropriate shipments and then select Print from the drop-down menu. The print options will be shown to you.
Click Print Invoice to print the invoice for the selected shipment(s). The invoice for the specified order(s) will then be created and shown on the screen in pdf format. The invoice may be printed using the various printing choices. The invoice will be downloaded and displayed in the manner depicted in the screenshot below.
Manifest
This interface makes it easy to create or update the 'Shipping Manifest' for your items based on orders from both your own store and marketplace channels.
The available manifests are shown by default. However, the following filtering options are available to help you find the relevant manifests:
-
Logistic Supplier: You may use the needed logistic provider to filter the manifests.
-
Manifest ID: The needed manifest id can be used to filter the manifests.
-
AWB Number: The needed AWB number may be used to filter the manifests.
-
Date Range: You may filter the manifests by the required manifest creation date range.
Manifests referring to a certain store/warehouse location can be filtered.
Both integrated logistic providers and bespoke logistic providers can generate manifests.
Select the appropriate logistic provider, store location, and submit to produce a manifest for your shop orders.
Select channel, logistic provider, and location to build a manifest for orders at the marketplace channel, then submit.
You can scan or manually add the necessary AWB numbers to the manifest until it is closed after it is produced.
After scanning/adding AWB numbers, the shipments will be transferred from the 'Waiting for Pickup Orders' list to the 'Dispatched Orders' list.
How can I construct a shipping manifest for your items based on orders placed on your website or through marketplace channels?
Go to Leads and Orders. Then select Manifest. You'll be sent to the page for the manifest(s).
The accessible manifests (if any) can be found in the List of Manifests section.
You may also use the different search options offered here to find the relevant manifests.
Click Create Manifest to start creating a manifest. The page Create Manifest will appear.
My Orders and Marketplace Link Orders are the two tabs here. The My Orders tab will be chosen by default.
Creating the manifest for your shop orders (Scenario 1):
Go to the My Orders page to build the manifest for your shop orders. From the Logistic Providers drop-down in the Select Provider dialogue box, select the corresponding logistic provider for whom you are preparing the 'Shipping Manifest.'
From the Location drop-down, choose the shop location where the items will be dispatched.
Submit the form. The dialogue box will be closed, and a manifest against the logistics provider will be produced.
Scenario 2: Creating the manifest for the marketplace channel orders:
Click the MarketplaceLink Orders tab to build the manifest for the orders in the marketplace channel. The fields below will be presented to you.
From the Channels drop-down, choose the channel where orders are raised.
You have two options for shipment: I you manage the shipping, and ii) the Marketplace Channel handles the shipping.
From the Marketplace Providers drop-down menu, select the appropriate logistic provider.
From the Location drop-down, choose the store where the items will be transported.
Submit the form. The dialogue box will be closed, and a manifest against the logistics provider will be produced.
The manifest is currently being produced. By scanning the AWB numbers or manually inputting the AWB numbers, you may add the items to the manifest.
Click CLOSE if you don't want to add any more products to this manifest and want it to be finished. The manifest will be closed, and the shipments involved will be transferred to the Dispatched orders list. A success message will appear on the screen.
Updated almost 2 years ago
