Picklists
A Picklist is a list of items that must be chosen from a warehouse/store in order to complete the warehouse/permitted store's Orders. Selecting all or part of the goods from needed Orders may be used to construct a Picklist.
Picklists should be produced by location (store/warehouse) and allocated to a designated individual (for example, a store operator or a picker) to process them. 'Zone wise' against the given place may also be used to construct a picklist. This capability is useful for picking up things where certain products are kept at each location per zone.
You may also make a picklist against any certain 'delivery slot' on a specified day. You may establish a picklist for each of the essential marketplace channels.
After you've finished creating the picklist, print it out and give it to the individual who will be picking the goods.
Picklists help the methodical procedure of item selection in accordance with received Orders, reducing the time required to pick the products. The goods may be chosen fast and simply, ensuring the highest level of accuracy in order fulfillment.
How to create a picklist?
Select Create Picklist from the Picklists menu. You'll be sent to the Create Picklist page under Picklists.
You can also go to the Picklists > Create Picklist page by going to the 'Picklists > Manage Picklists' page and selecting the Create New Picklist button.
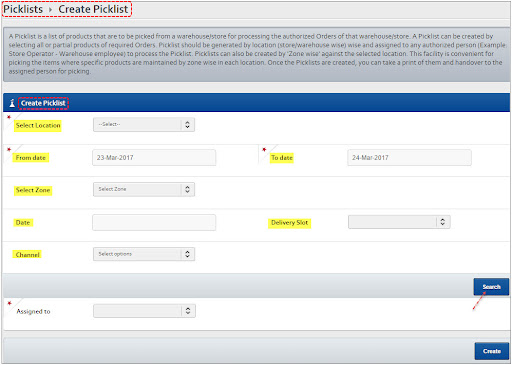
Select a store/warehouse location for the picklist to be created from the Select Location drop-down.
The previous and current days are picked by default in the From Date and To Date 'date selectors.' When you search with default dates, the 'Authorized Orders' that are received at the selected location but for which no picklists have been made will appear. However, using the relevant 'Date Pickers,' you may change these dates to suit your needs.
From the Select Zone drop-down menu, choose 'Zone' (optional). When you choose a 'Zone,' the search results will provide a list of 'Authorized Orders' from the given location that were received during the specified date period and contained items from the chosen 'Zone.' As a result, you may use this option to generate 'Zone wise' picklists.
Choose the desired date from the 'Date' 'date picker'.
Select the desired delivery slot from the Delivery Slot drop-down menu to get a list of the orders for that delivery slot on the specified date.
Choose the relevant marketplace channel(s) from the Channel multi-select drop-down to get a list of that channels' orders.
Click the Search button. As illustrated in the image, the corresponding ordering will be listed in the grid.
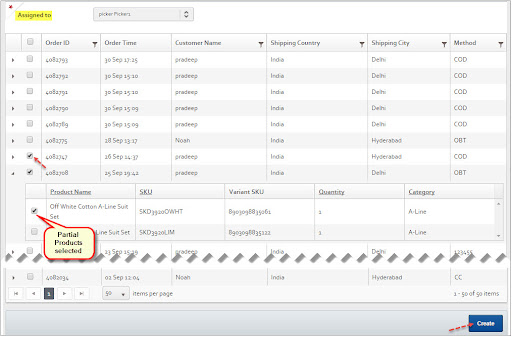
Click 'Create' after selecting full Orders or needed Order goods. The picklist will be formed, and a corresponding success message will be shown.

How can the selection of items from a picklist be confirmed?##
Select Confirm Picking from the Picklists menu. You'll be sent to the Confirm Picking page under Picklists.
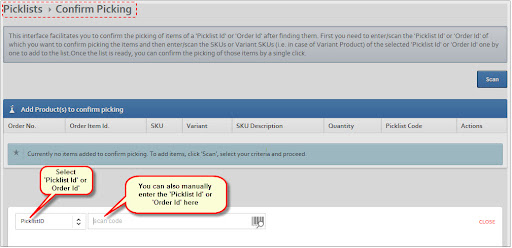
The 'Picklist Id' or 'Order Id' can be used to confirm item selection. Select the PicklistID option from the drop-down to confirm via the 'Picklist Id'. So, you may scan or input the 'Picklist Id' here utilising this option.
Scan the 'Picklist Id' of the picklist you wish to confirm. As illustrated in the image, the information of the corresponding picklist will be presented.
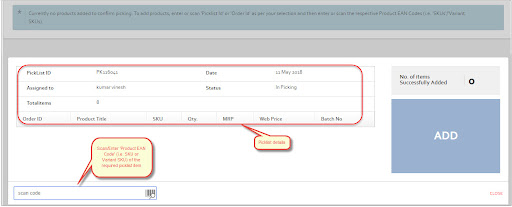
Scanning or entering the Product EAN Codes (i.e. 'SKUs'/'Variant SKUs - in the case of Variant Product') of the specified 'Picklist Id' one by one is now required.
The grid will be updated with the appropriate products. To change the item level information, you have two alternatives.
- You have the ability to change the MRP and Web Price.
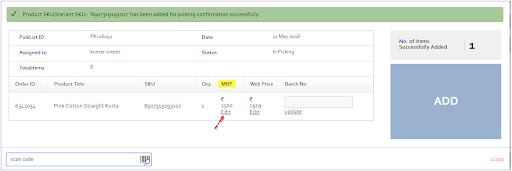
You can make changes to the MRP or Web Price (if required). To edit the MRP, go to the MRP column and click the Edit link. To modify the MRP, a text will be presented.
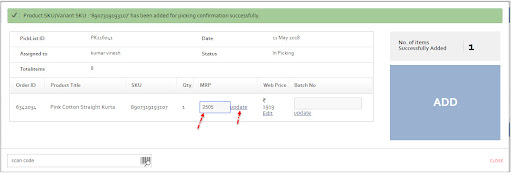
Click Update after making changes to the MRP. The MRP will be modified, and a success message will appear.
- For needed products, you can specify item-level information. For instance, Batch/Sl.No./Expiry, and so on.
If applicable, enter item-level information (in this case, the batch number) in the appropriate area and click Update. The item-level information will be updated, and a corresponding success message will be presented.
Similarly, for the needed goods, adjust the pricing and any specific item-level information.
When you're done, click Close. The dialogue box will disappear, and the newly added goods will appear as indicated in the below image.
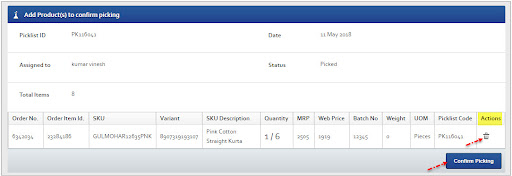
If necessary, you may eliminate the undesirable products by clicking the trash icon in the Actions column.
By pressing the Scan button, you may add additional picked item/items to the picklist.
You can confirm the picking once all of the items have been added. Click Confirm Picking to confirm the selection.

If necessary, you may eliminate the undesirable products by clicking the trash symbol in the Actions column.
By pressing the Scan button, you may add additional things to the picklist.
You can confirm the picking once all of the items have been added. Click Confirm Picking to confirm the selection.
On the 'Picklist Summary' page, there are five tabs. They are as follows:
-
All: The 'All' tab displays all of the picklist's mapped products.
-
Pending: The Pending tab contains items that have no status, such as 'found' or 'not found.'
-
Not Found: Required items can be manually transferred from the 'Pending' page to the 'Not Found' tab.
-
Confirmed: The confirmed picklist items will be instantly moved from the 'Pending' tab to the 'Found' tab.
-
Removed: You can remove needed picklist items from any tab, and they will be listed under the 'Removed' tab.
From the Picklists > Picklist Summary page, you can now set a picklist's status to Picked. To do so, select Status from the drop-down menu. The options listed below will be shown.
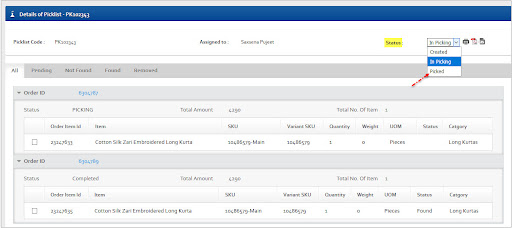
From the Status drop-down menu, choose Picked. The state of the picklist will be changed to Picked, and a corresponding success message will be shown.
How can I manage picklists and perform certain tasks?
This interface allows you to examine and manage existing picklists as well as create new ones.
The 'Open' page displays picklists with the 'Created' and 'In Picking' state.
The 'All' tab displays all picklists, including those with the 'Picked' status.
Picklists with the status 'Picked' appear on the 'Picked' page, from which you can print a picklist or its labels, as well as download a picklist in CSV format.
Under the 'Not Found' tab, picklists with some not found items will be presented.
By clicking a picklist's code, you may get to the 'Picklist Summary' page.
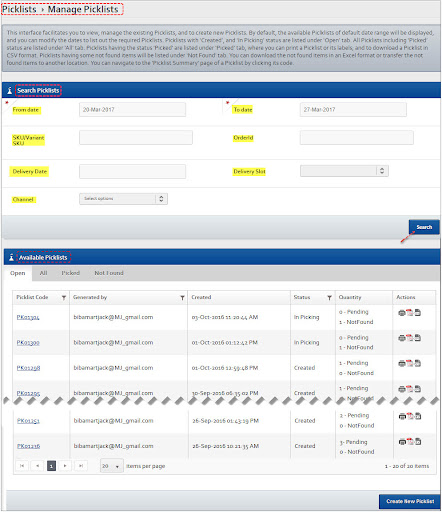
Under the Open tab of the Available Picklists section, the available picklists for the chosen date range will be presented by default.
TIP: Using the various filtering options, you may create a list of picklists. Then, based on your search parameters, the appropriate picklists will be provided below.
How to mark certain items as ‘Not Found’
Go to the picklist with the pending goods. Under the Open tab, click the 'Picklist Code' that has pending products. The page 'Picklists > Picklist Summary' will appear.
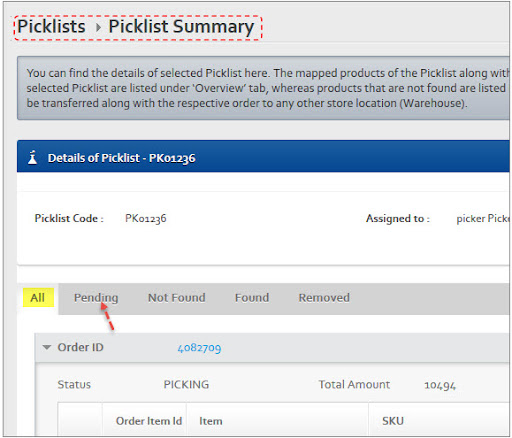
Select the Pending tab from the drop-down menu. Orders with pending items will be presented to you.

Mark the needed goods from the various orders as not found by clicking 'Mark as Not Found.' The goods you've chosen will be transferred to the 'Not Found' menu, and you'll receive an appropriate success message.
Updated almost 2 years ago
