Returns - Customer Return
This is a list of orders that consumers wish to return due to a variety of reasons.
When you request a 'Reverse Shipment' for all or required goods of a 'Delivered Order' (see: Initiate Refund or Replacement/Exchange of Delivered Orders), the shipment will be shown under the 'Return Initiated' tab at first.
The cargo will be transferred from the 'Return Initiated' tab to the 'Pending Pickup' tab after you assign a logistic service provider to pick it up from the client.
You can transfer the shipment to the 'Received' page after receiving the item(s) from the client and begin the return (i.e. replacement or exchange)/refund activity.
The cargo will be immediately transferred to the 'Closed' page after the return/refund process is finished.
How do I deal with orders that have been returned by customers?
Follow these steps to handle orders that have been returned by customers:
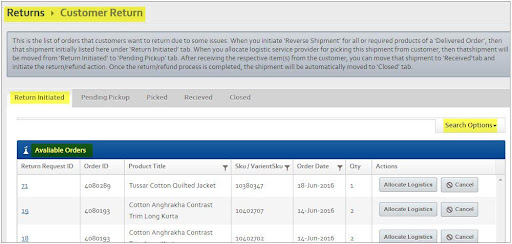
- Go To Orders & Leads > Click on Returns > Customer Returns
-
Return Initiated, Pending Pickup, Picked, Received, and Closed are the five tabs available.
The Return Initiated tab is accessed by default, and it shows the available 'Return Initiated' orders. -
Allocate logistics for orders that have been returned by customers:
- When you reverse ship delivered orders to the origin in the case of customer returns, those orders will appear on the Returns > Customer Return page under the 'Return Initiated' tab.
- All returned orders will be posted in the Available Orders area, according to the 'Delivered Orders' page. If there are a lot of shipments, you may use the Search Options to sort them out and identify the ones you need (s).
- Under the Available Orders section, the relevant shipment(s) will be mentioned.
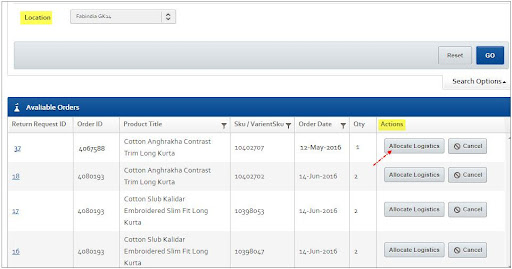
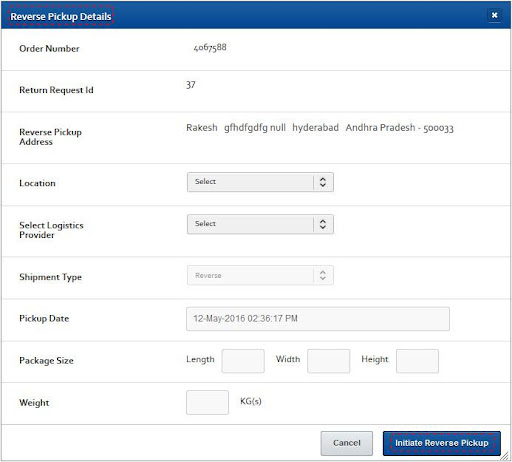
- Click the corresponding Allocate Logistics button beneath the Actions column to allocate logistics for the return started orders. The dialogue box for Reverse Pickup Details will appear.
-
From the Location drop-down, choose the shop location where the returned item should be delivered.
-
From the Select Logistics Provider drop-down, choose the name of the logistics service provider who will pick up the item from the custom location.
-
When you choose a Custom provider, two additional fields appear, namely Provider Name and Airway Bill Number.
-
In this scenario, fill in the Provider Name text box with the name of your custom logistic provider and the Airway Bill Number text box with the relevant Airway Bill Number.
-
The Pickup Date date selector allows you to change the pickup date (if required). In the Length, Width, and Height text boxes, type the package's dimensions (Optional). In the Weight textbox, type the package weight in kilograms (Optional).
-
Click Initiate Reverse Pickup to start the reverse pickup. After closing the dialogue box, the cargo will be transferred to the Pending Pickup tab.
-
A success message will appear on the screen: Confirming the Items to be Picked
-
The appropriate cargo will be placed on the Pending Pickup page after you have initiated the return.
-
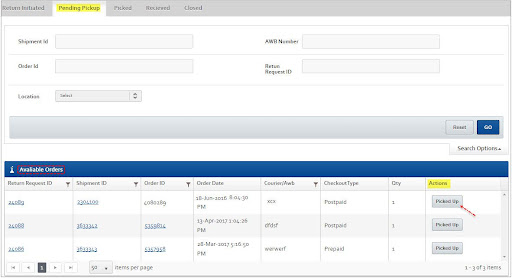
Click the same to see the list of shipments under the Pending Pickup tab. Refer to the image below.
-
If there are a lot of shipments, you may use the Search Options to narrow them down to the ones you need.
-
Under the Available Orders section, the relevant shipment will be mentioned.
-
Click the Picked Up button of that order under the Actions column after the shipment's item(s) have been picked up. The chosen cargo will be put to the Picked tab after being marked as picked up.
-
A suitable success message will be presented to you.
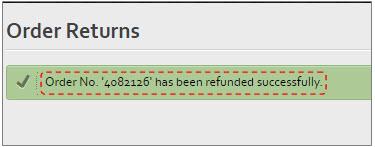
Some merchants wish to conduct the refund, replacement, or exchange as soon as the customer's return item is verified. They can do so by selecting Replacement or Refund from the Picked tab's relevant buttons.
Only when the Enable return before receiving the shipping item checkbox is activated in the Application Settings > Order Settings page will the Replacement or Refund buttons appear under the Picked tab.
The majority of merchants prefer to conduct refunds, replacements, and exchanges only after receiving the item from the consumer via logistic service workers. As a result, they can do so using the Received button on the Picked tab.
So, the Picked tab may be used to do both actions: executing the refund or replacement/exchange, and verifying the received products.
Immediately after picking up the returned products, process the 'Refund' or 'Replacement/Exchange':
Processing the Refund:
To see the available shipments, go to the Picked tab. The portion after that will be seen.
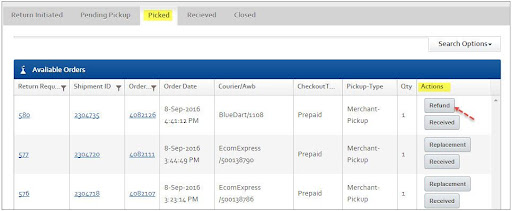
To process a refund, go to the Actions column and click the Refund button for the shipment. The Order Returns page will be shown.
Auto Refund: Select this option to have the order's payment mode refunded automatically.
Note that restricted payment methods, such as PayU, may provide the Auto refund feature.
If the 'Auto Refund' option for the payment gateway is chosen, the 'Auto Refund' checkbox will appear.
For Payu:
The 'Payment type', 'Bank Name', 'AC. No.', 'IFSC Code', 'Refund Amount', 'Payable Ref No.', Payment Date', and 'Remarks' choices will be hidden if you choose the 'Auto Refund' checkbox, and you will just need to hit the 'Submit' button.
Perform the following steps if the 'Auto Refund' option is not selected:
From the Payment Type drop-down, choose NEFT, Check/DD, Credit Card, or eVoucher as the method of return payment. Except for eVoucher, you'll see necessary text fields for each payment method. Fill in the essential information in the appropriate text areas.
In the Refund Amount text box, type the amount you're returning to the customer as a refund.
In the Payable Ref No text box, type the payment reference number.
The Payment Date 'Date Picker' allows you to choose the payment date.
In the Remarks text box, provide any further comments.
Submit the form. A dialogue window will ask you to confirm your action.

In the dialogue box, click OK. The refund process will be finished when the dialogue box is closed. A suitable success message will be presented to you.
Under the Picked tab, you can now just see the Received button next to the package. You can double-check the products you've gotten, as detailed later.
Processing the Replacement or Exchange:
To see the available shipments, go to the Picked tab. The portion after that will be seen.
To perform a replacement or exchange, go to the Actions column and click the Replacement button for the shipment. This will take you to the Order Returns page.
In the SKU text box, type the SKU or Variant SKU of the replacement product and click Search. In the Qty and Price text fields, the minimum purchase quantity and price for that item will be automatically obtained.
Change the number or price to meet your needs, then click Add. If the replacement product's worth is higher than the returned products, you'll be prompted to confirm via a dialogue box.
When you click OK, the dialogue box closes and the replacement product is added to the grid in the Select Replacement Product section.
Similarly, you may add more goods (if necessary) by repeating the procedure or by choosing the Browse & Add button and browsing the various search possibilities. In the grid, the relevant products are mentioned.
From the Shipment Mode drop-down, choose the shipping mode for the new product.
In the Shipping Amount text box, type the shipping cost for the new product.
In the Tax Amount text box, enter the tax amount for the new product.
Submit the form. You'll be prompted for confirmation in a dialogue window.
On the dialogue box, click OK. The dialogue box will shut, the replacement or exchange procedure will be finished, and a success message will be shown.
Under the Picked tab, you can now just see the Received button next to the package. You can double-check the products you've gotten, as detailed later.

To see the available shipments, go to the Picked tab. The portion after that will be seen.
If there are a lot of shipments, you may use the Search Options to sort them out and identify the ones you need. Under the Available Orders section, the relevant shipment will be mentioned.
Under the Actions columns, you'll find the Replacement, Refund, and Received buttons. Depending on the return action for the package, the Replacement or Refund option will appear.
Confirming the Item Received:
If you have received the returned item, click the Received button. The dialogue window for received items will appear.
Select the place where the products were received from the Select Location drop-down menu.
Under the Received Quantity column, you can adjust the received quantity (if necessary).
Submit the form. The dialogue box is closed, and the shipment is transferred to the Received tab.
A suitable success message will be presented to you.
Processing the 'Refund' or 'Replacement/Exchange' action on items that have been received.
Once the consumer has received the products, you may confirm receipt and conduct a refund, replacement, or exchange based on the customer's request.
Note: As indicated in the previous step, you can also commence the refund or replacement/exchange once the item are picked up from the client.
- To process a refund, go to the Actions column and click the Refund button for the shipment. This will take you to the Order Returns page.
- Please see the Processing the Refund: section in the preceding step for further information.
- Once the refund procedure is complete, the only action available under the Actions column for that shipment is the Close button.
- To perform a replacement or exchange, go to the Actions column and click the Replacement button for the shipment. This will take you to the Order Returns page.
- Please see the Processing the Replacement or Exchange: section above for further information.
- Once the replacement or exchange process is complete, the only action available under the Actions column for that shipment is the Close button.
- After a 'Refund' or 'Replacement/exchange' action, the shipment is closed.
- Once the 'Refund' or 'Replacement/exchange' process is complete, a Close button will appear in the Actions column next to that shipment.
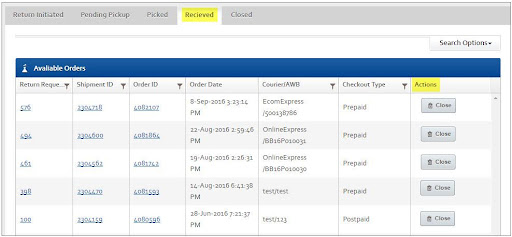
Close the window with a click. The applicable cargo will be transferred to the Closed tab, and a suitable success message will be provided.
Updated over 1 year ago
